The most inexpensive way to insulate and soundproof building structures is to finish with foam plastic boards. The material is also used for decoration in the form of tiles, baseboards and other elements. Often there is a need for precise adjustment, for which the slabs have to be cut. It is difficult to do it smoothly and without debris. Let's figure out how and what to cut polystyrene foam at home to get the best result.
What are foam boards
Expanded polystyrene, this is the second name for foam, consists of air bubbles enclosed in a plastic shell. They are glued together and form a mass with low density. Air in each slab of material is about 95%. That is why the material retains sound and heat well. But at the same time it crumbles, breaks and bends when mechanically damaged, cannot withstand high temperatures, and is easily flammable.
Despite this, expanded polystyrene is widely used as an insulator. In addition to good insulating properties, it is easy to install. Light weight with significant dimensions facilitates installation and does not load the building structure. The slabs are not afraid of high humidity; insects and microorganisms do not settle in them. However, almost all technical liquids, including acids, alkalis, solvents and some types of adhesives destroy the structure of expanded polystyrene.
Instagram promstroipenoplasty
Instagram polistirolbetontsentr
Shaped cutting of foam plastic
Foam plastic is one of the most popular finishing products. Various figures cut from such material are especially popular. Volumetric foam compositions are used as architectural decoration, to create advertising elements, and various design structures for interior decoration.
Figure cutting is carried out using laser systems and special CNC machines. Each device has its own advantages and features of use:
- Laser cutting. Processing foam plastic through radiation allows you to create 2D and 3D shapes of various shapes. This cutting method ensures the minimum cut thickness, helping to increase the detail of products. The entire process on laser CNC equipment is fully automated. Therefore, in the process of cutting the material, defects and errors are eliminated.
- String processing. The formation of volumetric products occurs using the thermal effect of strings made of nickel-chrome. This method of cutting foam ensures accurate cuts according to given sketches. The cost of string processing of cellular material is much cheaper than laser cutting. All actions on the machines are controlled by a special computer program.
Using modern 3D foam cutting equipment, you can produce shapes of varying complexity in a short period of time.
How and how to cut polystyrene foam so that it does not crumble
The structural features of the material explain the difficulties when cutting it. The plastic bubbles are not tightly connected to each other; when pressed, they break off quite easily. During the cutting process, a lot of them appear. The balls separated from the base become electrified, which makes cleaning much more difficult. Sometimes the consequences of cutting foam products cannot be eliminated for several days.
This must be taken into account when choosing a method and tool for cutting foam.
What tools are used for cutting
- A sharp thin knife, for example, a stationery knife.
- Hacksaw for wood or metal.
- Angle grinder, also known as grinder.
- Soldering iron.
- Thin metal string.
- A professional machine or its homemade equivalent.
- Thermal cutter.
The choice of tools is determined by the volume of work to be done and the degree of their accuracy. Thus, the use of cold devices ensures that the material will crumble to a greater or lesser extent. Heat tools provide an even cut without debris, but their price is high. Not everyone can buy them for themselves. Let's figure out how to work with different tools.
Cutting without thermal aids
If you don’t need to cut out a complex shape from polystyrene with your own hands or make a figured cut, you can safely cut it with a knife or cutter. The main thing is that the length of its blade is greater than the thickness of the plate. Otherwise, the cut may turn out lumpy and crooked. When joining insulation, cold bridges are formed in these areas, which will reduce the quality of insulation. Therefore, the best tool for cutting plates up to 40 mm thick is considered to be a regular stationery knife-cutter.
Instagram grosshaus
Instagram krasnaya133
For cutting thicker slabs, use a hacksaw. To work, in addition to the tool, you will also need a long metal ruler or a straight line, a marker and a tape measure.
Correct work process
- Place the plate on a solid base. So that she doesn’t “play” on it.
- We carry out markings. We measure using a tape measure and use a ruler to mark the line where we will cut.
- It is advisable to warm up the blade a little, so it will cut better. We press the guide to the intended line and make a cut. If the layer is too wide, make a cut on one side, then turn it over and make another cut exactly opposite the first. Then, with a sharp movement, we break off the plate.
Some craftsmen recommend periodically sharpening the knife; it becomes dull very quickly during the cutting process. Cutting polystyrene foam with any type of hacksaw is no different from working with a cutter knife. It is important that the length of the blade exceeds the thickness of the plate, and that the saw teeth are as small as possible. You need to move the canvas very smoothly, trying to avoid jerking. Otherwise, a lot of foam sawdust will form.
Sometimes a grinder is used. It cuts accurately and quickly, but leaves a lot of debris. For work, it is better to choose a disk with fine teeth, but this does not prevent sawdust. Sharp parts rotate at high speed, which explains significant destruction of the material structure. Much depends on the craftsman, but more often than not the cut ends up torn. An electric jigsaw gives a similar result.
Instagram leaderstroyinstrument
Instagram bosch_go
The straightest cut will be given by a string for cutting foam. This is an ordinary wire, with a diameter of no more than 0.5 mm. Handles are attached to its ends. Two people take them in their hands, set the string on the intended line and smoothly grind the material, adhering to the markings. As the metal moves, it heats up and melts the plastic in the cut area. Therefore, the edge can be cut smoothly with a minimum amount of debris. True, this takes a lot of time.
How to cut polystyrene foam with thermal instruments
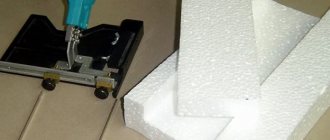
For straight cuts, a knife or saw is sufficient, but they will not be able to make curved cuts. They are performed with special equipment, the operating principle of which is associated with heating the cutting blade. Electrodes are connected to it, to which voltage is applied at the moment of activation. The cutter heats up and easily melts the foam, cutting out the specified shapes or lines. Such machines are used by professionals. Buying a professional device for cutting foam plastic for one-time use is not profitable. If possible, it is better to borrow or rent it. But most often homemade devices are used at home. With their help, cutting is carried out with nichrome wire on a machine or with a self-assembled thermal cutter. They also use a regular soldering iron, the tip of which is flattened or a small blade is attached to it.
In any case, first mark the plate. Then turn on the device and wait until the cutter warms up. After this, they carefully move it along the intended line, performing an accurate and even cut. The easiest way to do this is with a thermal cutter, more difficult with a soldering iron. To get it right, it is advisable to practice a little with the device on defective or unnecessary pieces of material.
Instagram nadegniy
Instagram konovalova_mn
Methods for cutting sheets
For this purpose, you can use various cutting tools, for example, a grinder, only then you should use the thinnest disk. Very often, builders use a simple sharp knife. Sometimes it is advised to use a hacksaw with very fine teeth, but the latter method is very questionable. In addition, stores sell special thermal knives designed for working with foam plastic.
The thermal knife heats up to 600 °C in just 10 seconds. However, this tool is quite expensive, so it doesn’t always make sense to buy it.
The way out in many cases will be a device for cutting foam sheets, made independently. It is probably somewhat cumbersome, but if you have the necessary components, it is absolutely free and always available. And if you have to do large-scale work, for example, you have ahead of you the insulation of a huge house that you built for your large family, then the question of how to conveniently cut the foam, and even a lot and quickly, will not come up throughout the entire event, no matter how small it is it took a long time.
Required tools and materials
Polystyrene foam is a lightweight material that can be cut using a variety of tools. In some cases, the accuracy and cleanliness of the cut is of no small importance. These properties can be achieved using the following tools:
- an ordinary sharp knife;
- small stove or hacksaw;
- strong string;
- knife with thermal effect;
- thermal cutter;
- cutter with laser beam.
Each builder has his own preferences regarding the choice of one of the tools. All tools allow you to process foam plastic efficiently and form an even line. Foam plastic has low resistance to mechanical stress - this should not be forgotten when choosing a tool.
Getting 2d shapes
When producing two-dimensional parts on the SFR-Standard unit, files in PLT format are required. To open the required file, you need to select “2d figure processing” in the menu.
After the file is loaded into a separate program window, you can use the “edit” button for more productive setup and management. With its help, missing details are adjusted, corners are smoothed, and the scale of the figure changes. Having loaded the created files and configured certain parameters for the machine, further control is carried out using three buttons:
- soft launch;
- pause;
- stop.
Changing machine parameters
When making machines for cutting foam plastic, it is necessary to take into account the fact that in the future there will be a need to cut thicker sheets of materials, while short screws can be unscrewed and longer ones installed in their place. In order to press in, you need to make a hole in the base. Its diameter should be less than this indicator characteristic of the rack, the difference should be 0.5 millimeters. When making machines for cutting foam plastic, the racks need to be driven into the holes with a hammer, but to facilitate the procedure, it is necessary to process the sharp edges of the ends with sandpaper. Before you start screwing the screw into the rack, you need to cut out a groove under its head. In order to do this, you need to clamp its end with a screwdriver, while a thin file should be placed under the head, and then rotate. The groove is necessary in order to strengthen the wire in one position, which can move during adjustment. In order for the wire not to sag, elongating after heating, it must be fixed to the springs, and then to the screws. When making machines for cutting foam plastic, you need to prepare all the fasteners, and then strengthen the nichrome wire. In order to ensure reliable contact between it and the current-carrying wire, you need to use a technology called “unwinding with crimping”. The copper wire must have a cross-section of at least 1.45 sq. mm.
Step-by-step instructions for making a cutter
First we need to decide on the tools and materials that we will need to create the cutter. The list of required materials includes:
- A sheet of chipboard or other dense base, approximately 600 by 400 millimeters . The size can be changed, it will depend on the size of the sheets you are going to work with.
- A flat wooden strip, about a meter long.
- Material for legs: 4 caps from plastic bottles, a piece of lath or other material.
- Nichrome wire, approximately 0.4 mm . You need about half a meter, but it is better to buy with a reserve.
- Tension spring. It is for tension, not compression. Such a spring cannot be found everywhere.
- 10-15 screws.
- Wires, crocodiles for fastening them.
- Computer power supplies and cable for it.
Now let's move on to the tools that we will need to manufacture and assemble the structure. These include:
- Drill or screwdriver;
- Jigsaw or hacksaw for wood;
- Screwdriver;
- Pliers;
- Drill for screw diameter.
Prices for popular drill models
The danger of manufacturing a thermal cutter based on LATR
Adjustable laboratory autotransformers are often used in the manufacture of homemade thermal cutters. This is what FORUMHOUSE user Sidyakin did.
Sidyakin
Assembled a cutter for dissolving foam plastic. The basis of the machine is the desk cover. We also needed two studs, nuts, washers, a spiral from an electric stove, an LATR and a switch.
Oleg Lvovich
I see in the photo that the cutter is set to 40 Volts. On my cutter the transformer produces 36 volts. I advise you to be more careful when working with LATR. If there is a breakdown, then a voltage of 220 Volts will go to the wire.
Anton48 FORUMHOUSE user
I also want to make a foam cutting machine. I'll take a nichrome thread from an old electric stove. I also have LATR-2M. Would this be good for a cutter? There are six exits. I don’t understand, where to connect the network and load?
Andrey-AA FORUMHOUSE user
You cannot work with one such LATR - it is dangerous, you can get under 220V, because the LATR does not decouple the output from the input, regardless of the voltage set on it. You either need an additional transformer, or connect the inputs and outputs strictly “zero to zero”. That is, without plugs and sockets, but constantly, knowing exactly where the zero is and where the phase is.
Electron
Such a system cannot be phased for safety. There will always be a dangerous voltage on the nichrome thread relative to the ground. This is an autotransformer. You also need a transformer at the input. Look how I did. Electrical diagram at the beginning of the article.